HOME | FACEBOOK | FLICKR | INSTAGRAM | BLOG LIST | CONTACT ME

Pages

Showing posts with label tutorials. Show all posts

Wednesday, December 30, 2009

小木屐little clog tutorial.


tiny little clog.i believe that every chinese will know what's this.
clog is one of the traditional of chinese.
小小木屐~相信华人都知道吧?
木屐是华人的传统之一。

while i was using the wood clamp, it's break into two.
and this inspired me about the clog.
where one part of the wood clamp is similar to the sole of the clog.
Immediately, i have an idea of doing a tutorial.
so let us start now~~~~~~~
当我用着木架时,它突然坏掉了,分成了两根木和一个弹簧=.=
这给我了木屐的灵感。
那“木条”有一小部分很像木屐的鞋底
所以很快的就动手做了个教程~
让我们开始吧~

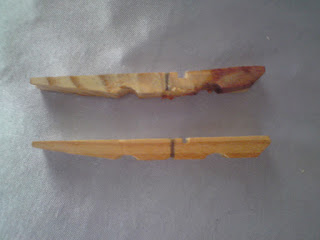
Firstly, break the wood clamp into two.(take off the spring)
and cut the broken wood clamp according to the line which shown in the image below.
首先,将木架分成两条“木条”(将弹簧拉出)
然后,把“木条”割断。如图示的线条


This is how it look like after that.
过后就是这样。


secondly, rub the sharp part into round by using the sand paper (please refer to the real clog to find out which part need to be round)
第二,将尖角的部分用沙纸磨圆(请参考真正的木屐,看看哪边该圆)


next, paint it into red (the clog we often seen is red)
下一步就是将它上色咯~我们平常看到的都是红色的。


then, cut a red paper strip and paste it like the image shown.
And that's all~FINISH~
easy rite?
最后呢,剪下红色的纸条,如图示粘上便完成咯~
容易吧?


tata~the big clog and the tiny little clog~
大大的木屐和小小的木屐


i did the other color also..
it's pink!!!with polka dot~
我也做了另一款,粉红色的~还有小点点~


more design will be do~
会做更多的不同的~^^
敬请期待~呵呵~


wish that you will understand the tutorial i wrote.
希望大家能明白这教程~

Sunday, December 13, 2009

***miismi***alien rabbit钥匙包

表姐生日到了~就做了个钥匙包送他。
在想做怎样的好呢~想到最近好爱做兔子,那就好吧!就来个兔子钥匙包好了!!
哈哈~顺便就做了个教程~

首先呢,剪好布料~我的是兔子所以就是这样咯~
耳朵的布呢要四块~脸部也是四块.留0.5cm 缝份
(脸部:里布x2(poker dot布),外布(粉红ribbon布))


将外布和内布缝合(如图示,在两条白线之间的位子。)


缝好耳朵的部分,留反口。


把兔子耳朵反过来。反之正面。如图示将耳朵折缝。


将缝好的两片表布和里布沿线缝合,并在图内所示的留钥匙口。


反至正面~


将耳朵和脸部缝合~如图示在里布和外布之间。
然后沿钥匙口缝一圈。


整理表布和里布,将绳打死结穿入钥匙孔,套入环。
最后放上蝴蝶结和帮兔子放上表情~
我的兔子表情~copyright~哈哈~这是miismi alien兔兔~


Tuesday, November 24, 2009

Book's cover - MUM'S RECIPES

today is my mum birthday, so i had made a homemade recipe book for her since she love to read book of recipe.
please take note that the recipe were not homemade, but the book was homemade, that's mean the recipes inside that book were taken from somewhere and the book was made by me.XD i don't know how to cook wei~haha~ i just know how to fry egg, but i don't know how to open the egg.=.=shh~

while doing the book's cover, i had capture the process since i had promised Jennings to do a tutorial of how to do a book's cover.
1. prepare the fabric you want to do as your cover.and also prepare a note book also..
(the book showned inside the photo was the recipes i printed out and binding it)
the fabric that i prepared was sew by myself..the words and the pictures.
准备你要用来当封面的布和一本笔记本。

2.the fabric prepared has to be twice of the book..
the photo showned the fabric which folded half..
那布必须是你的笔记本的两倍。
图里的布是这一半了的。


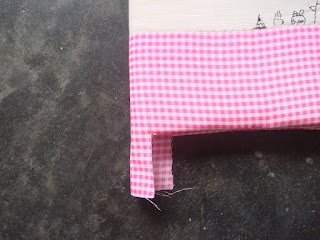
3. and prepared the cotton sheet which need to be fit to the book.(measure it as showned in the photo)
准备铺棉。如图示,铺棉须足够盖完书的表面。(请如图量你所需的铺棉。)


4.after the cotton sheet, cover it with fabric.
放上一层铺棉后,包上布。


5.wrap up the book like how you wrap your school text book with plastic.then use masking tape to fixe it.
像你包扎学校课本那样包扎那本书,然后用masking tape固定。


6.because of the ring of the book, so there was the remaining couldn't be wrap..
由于那书的圈圈阻挡了,所以会有多出的。把它塞进去中间的洞洞~


7.then, use uhu glue to stick all the part.
然后用uhu glue将全部边粘好。


8.use a piece offabric to cover it.
用不织布盖上。封面和最后的书皮一样。
DONE~~!!!!
This was handmade recipes for my mum's birthday~~!!!hehe..
somemore got rank..XD

thr's a bookmark inside..did by my sister~haha..a cake..


Wednesday, September 30, 2009

deco table

now i finally found out a way to copy and paste the new post from another post that i have posted~hahahaha~so now only i copy and paste the tutorial for the deco table from dmaom website~hahaha~but edited some words.
here i come~

最近很爱做一些外国风的~很典雅~

首先呢材料很简单,铁线,钳子,uhu glue或白胶浆(其他可以粘稳的胶水都可以使用,只要干后是透明的),透明片,白色acrylic paint或白色的spray,

1.用钳子把铁线凹成这样


2。 顺着凹,要密密哦~疏疏的酒不好看了~不用太大,一个10sen那么大就好了。


3。再凹三个 如图的形状。


4。三个重叠一起,用另一条铁线顺着卷,帮经他,要够紧哦~不然铁线会一直移位。


5。卷好后,把三个铁线拉开。


6。再做桌子的脚。调整三边的高低。


7。再把刚刚卷的蜗牛形的东西用uhu glue(白胶浆也可以)粘上。
待干。


8。在透明片上画上,直径8cm。剪出。


9。用arylic或喷上白色的spray。待干。


10。如果是用acrylic的话就得另外喷上透明spray。这样看起来才会亮亮的~
待干。


11。把透明片粘上~


12。最后粘上白色珠子在边缘~完成~
ps:没tako和luna他们的那么好,我的只是杂鱼~将就点吧~哈哈~

Saturday, August 8, 2009

蝴蝶上色教程~碗如请看~

前天,干弟的女友,碗如,请我帮她画一个草稿图,是她考试的题目。
那是我去年SPM的题目。她选了另一题,但我觉得那个比较难画,而且比较难拿分。
我就帮她选了另一题。
那题目是说一个摄影师在拍一只蝴蝶停留在一朵花上的照片,题目要求透过那相机的镜头画出那画面。重点是komposisi,imbangan , bentuk , jalinan , ruang和warna。
以下是给她的上色教程。
画得有点乱,比如那翅膀的“尾巴”。
还有那朵花不是很好看,和上次我画的差很多,不够仔细。
对不起哦,因为赶时间。有些东西都遗漏了,到一半才加上去的。
而且功夫不到家,请包含~呵呵~
好吧!废话少说~开始吧~


1。 首先,用10到15分钟画出简单的图形。别话太深,不然等下图好会有笔印。
(自行画另一个翅膀,我忘了画。两个翅膀要一样大小,形状和它的corak。这样就有imbangan了)


2。把背景用水扫过,别太湿,因为怕太湿需要很长时间才干。如图。


2。然后就是上背景的颜色。如题,要有ruang,所以这样上可以显示远处很像还有青草或叶子的。蒙蒙的感觉。参考http://www.butterflypictures.net/images/butterfly1.jpg/
(对不起,录调转了。将就点吧~哈哈。)
颜色用黄,浅青和中青。中青请别太多。在扫过水的画还没干时,上完背景的颜色。
三种颜色的位置随你喜欢涂在哪。颜色请加多点水,以便涂出来的颜色浅浅,蒙蒙的。


背景完成~


3。待干后(差不多干也可以),上花的颜色。
颜色有黄,浅青和大便青(浅青+浅褐色)
把花的杆图上青色后,才加黄,如图。


然后才上些大便青。

完成后。


4。然后用白色如图点上。


5。在白点上点上黄色,盖掉一些白色,但别完全盖掉。


6。然后再点上大便青。别完全盖掉白和黄。


7。接下来涂“花瓣”(它不算花瓣,但我不知道叫什么。:P)
以下是握笔方法,和所用的笔款。


花的点法~
先点上深紫~


然后就深蓝~


然后就浅紫~


最后白色~


8。接下来,就是蝴蝶的翅膀。上黄色,或你喜欢什么色都行。PS:浅色会比较好看。
上颜色从最浅的颜色上起~


然后放点红色或其他色。我选黄配红是因为够鲜艳,比较吸引,将又有warna~
接下来其余的部分上黑色~PS:其余的部分用黑色会比较好看。但你要换色也可以。


然后就是画花纹时间咯~
我用白色~ps:可以换色~你喜欢。我用白色是因为比较明显~

放大:


放大~用白色画翅膀的外线~


放大~


放大~(翅膀的“尾巴”)


接下来~用黑色画上线条咯~


尾巴加条纹~
完成~


接下来~看到背景那有一dat一dat比较深色的吧?
那是你用来上花的时候的紫色来的。
加多多水~然后点在上面。不要太多,就点像那花的形状就好。
点几朵在背景四处吧~别太多~三四多就好~


ta ta~~~~完成~
PS:可以再加些orange色像红色那样涂~